 Share This Page
| Home | | Linux | | Nokia | | Share This Page |
Copyright © 2007, P. Lutus — Message Page
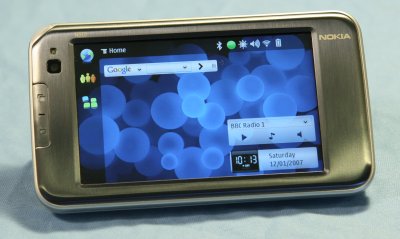
How to bring the Nokia N810 under your control
Introduction |
OS Update |
Breaking In |
Network Configuration
Miscellaneous Notes |
Conclusion |
Reader Feedback
(double-click any word to see its definition)
Tiny computers are gradually becoming better and more useful. I think this trend is positively correlated with the manufacturers' decision to use Linux (when that's true). The Nokia N810 uses Maemo, a carefully designed, lightweight Linux distribution that tries to squeeze as much performance as possible into the smallest storage footprint.
I have a particular weakness for tiny computers. I am frequently away from conventional sources of power and I often carry everything on my back (or in my kayak) to get where I'm going. So I find myself buying these little machines again and again as the years go by. But I confess the real fun begins when I figure out how to thwart the manufacturers' valiant efforts to keep their customers on the Kansas side of the user interface (think: Dorothy). Not that there is any great challenge involved (so far) — after all, it's Linux, an operating system designed to be accessible and transparent.
But, having said that, I want to warn my readers. This is not an article about how to download music more easily, or watch videos on YouTube, or change the colors of the user interface. This is about finding out as much as possible about the machine's insides, and there is a certain amount of risk involved. If you are not comfortable with hacking (with the old, positive meaning), if you are not skilled at following instructions to the letter, and if you are not willing to possibly brick your shiny new toy, then don't follow the instructions in this article.
I have added this cautionary note, not because these instructions are inherently risky, but because someone who is careless in executing them could get into difficulties, just as would be the case if a person always logged onto their system as root, and for the same reason — the most useful procedures in this article must be carried out with root authority.
Out of the box, it is virtually certain that the Nokia's OS version won't be current. Let's deal with that first, before making any settings that will be wiped out during a subsequent OS update.
I've covered this update step first because replacing the OS wipes out all user settings and customizations. Remember this for the future — any time you upgrade OS versions, either back up all your settings or accept that they will be erased.
NOTE: Do remember this OS replacement procedure, and keep a copy of the current OS version at hand. If things go wrong and the Nokia enters a mangled state, as a last resort one can nearly always recover by re-flashing the OS with a fresh copy.
Again, I remind my readers there is a certain amount of risk in these procedures, and if you aren't comfortable with root-authority command-line procedures, if you simply want stable, reliable performance and zero risk of turning your Nokia into a paperweight, I suggest that you skip this section.
Wi-Fi Configuration
The first step is to establish a Wi-Fi connection. Bluetooth is also available, but I don't think you can have Secure Shell (SSH) across Bluetooth, so it's not important at this stage. By default, the Nokia will seek out and connect with any available Wi-Fi access point using DHCP (Dynamic Host Configuration Protocol) to get the information it needs. If you have a Wi-Fi access point, the simplest approach is to set it up to negotiate a DHCP transaction.
There are alternatives to DHCP. One is to configure the wireless connection using a static IP address:
Didn't that seem like a lot of trouble compared to using DHCP? Well, yes, but in exchange, you don't have to figure out which address DHCP assigned to the machine for the next phase. DHCP may be a technological wonder and a great labor-saving device, but it won't normally tell you which machine got which address (a new Linksys wireless router will tell you if you know where to look, but that is an exception to the rule).
There are other approaches to finding out which address the machine was assigned:
With the Nokia's address, we can move on.
Root Access
We need to install a utility called "becomeroot." While we are about it, we might as well download a list of all the available software for this unit, and have it available for any future installations:
Now we have "becomeroot" available to get around a problem with the Nokia N810 — it doesn't have a root password and no straightforward way to create one. Ordinarily one would execute "su" and get to root access on a new system because there is no assigned password, then assign one. But the Nokia N810 is set up so there is no defined root password and no way to assign one — except by way of "becomeroot".
Secure Shell (SSH)
Now let's install a Secure Shell server. I know there is a lightweight version called "Dropbear," but it suffers from a number of defects, not least that it is called "Dropbear" and I keep losing touch with the small group of neurons responsible for connecting the name of "Dropbear" with the notion of "SSH." Return to the application manager, select and install "openssh-server". The installation process will automatically generate a system-wide key and open port 22. This means we should be able to log onto the Nokia from any PC on the same network.
Log onto your Nokia using the address acquired earlier and the newly assigned root password. In this example let's say the DHCP server provided the Nokia with the address 192.168.0.81:
# ssh root@192.168.0.81
Specifying the username "root" is a bit of overkill given that this is a root shell (signified by the "#" at the left), but I tend to include it for clarity. The local Secure Shell client will ask whether it should add this new entity to its list of known hosts. Say yes. Then enter the previously assigned root password. If you have been careful up to this point and have made no major mistakes, you should be in.
Creating User Accounts
At this point we can create another user apart from the default user (named "user") that is the client for the installed applications. The reason we do this is because we might have a pedestrian task to perform, one that doesn't justify being root (don't be root if you can avoid it), but we can't log on as "user" either, because "user" doesn't have a password and cannot have one assigned (I haven't sorted out the difficulties that might attend creating a password for "user").
This user-creation step is optional. Here are the steps:
It's a good idea to maintain an ordinary user account that isn't either burdened with a special role (as "user" is) or has root authority.
24-Hour Clock Display
Now that we have shell access, we can begin to address issues not formally dealt with by Maemo's user interface.
In Maemo one cannot directly configure a 24-hour clock display, instead one chooses a locale, and if your locale doesn't support a 24-hour clock, you cannot have it. The first thing I tried was setting a locale that did have a 24-hour clock display — Germany. The problem with this solution was that Websites that honor visitor locales would read my chosen locale and produce German content, and my German isn't good enough for that solution.
So here is yet another Maemo hack:
This also changes the date format, but that is a small price to pay for a 24-hour clock.
A digression. For my readers who don't understand the significance of a 24-hour clock, I must say it's one of those things that you either already understand, or may possibly never understand. It's something intuitive, like preferring the word "aluminium" over "aluminum", or "regardless" over "irregardless".
Is this a tempest in a teapot? Perhaps. Indulge me for a moment, dear reader, and choose the phrase below that is obviously wrong:
- Next year there will be less soldiers in Iraq.
- Next year there will be fewer soldiers in Iraq.
If you don't see the problem with sentence A, the style overwhelmingly favored by George Bush, then you also won't care about having a 24-hour clock.
Time Synchronization
This step is only partly successful at the time of writing. I normally use "ntpdate" to synchronize my networked machines, so I decided to see if I could make this work with the Nokia. The steps:
# apt-get -y install ntpdate
# ntpdate pool.ntp.org
# /mnt/initfs/usr/bin/retutime --rtc-from-system
I wrote a small script to automate these steps (copy the content of the box and put it into a Nokia shell script):
But what I have not figured out is how to automatically run this script at intervals — there is no "cron" facility in the Maemo version on the Nokia, no realistic prospect of installing "cron", and no obvious way to schedule a periodic action. There is a directory "/etc/cron.daily" present, but without a running cron daemon, I suspect this directory is an artifact, an oversight. In any case, once per day isn't often enough for optimal clock setting while moving the Nokia from place to place.
Update: A reader named Laszlo Marai has suggested that a script be placed in /etc/network/if-up.d/ to run "ntpdate" every time the Nokia connectes to a network. This seems like a good idea for those who are constantly connecting and disconnecting while roaming between wireless networks, as most people do.
Directory listing and manipulation using Konqueror on the desktop machine
This next step is more daring and upscale — let's create a file listing of the Nokia in the PC's Konqueror file manager (you are running KDE, yes?).
In the above section we gained access to the Nokia by way of wireless and SSH, which opens up a lot of possibilities. We can browse for specific files, replace default configurations with custom ones (thus avoiding the task of typing too much on the little Nokia keyboard), and expore.
Creating and saving network configurations
Until recently, Linux network configurations have been rather poor, difficult to automate and understand, but the present Maemo scheme is very well-defined (it's described here) and easy to understand and change. It relies on clear, strictly defined XML configuration files.
On the Nokia, a typical configuration will be located at:
/etc/osso-af-init/gconf-dir/system/osso/connectivity/IAP/(interface name)/%gconf.xml
I didn't find this out by browsing around inside the Nokia. Instead I used "scp" to copy the entire /etc directory tree to my desktop and searched it there, looking for particular names that I knew would be present (for some reason, searching the /etc directory tree remotely via the "fish" protocol wasn't able to read all the files).
I went to this trouble because setting up a network interface can be quite a pain if carried out on a tiny keyboard, and I expect to be upgrading operating system versions with some regularity, after which I can restore the saved configurations back onto the Nokia.
Again, as you set up your own network configurations, be sure to notice the "advanced" button that appears in the last step. This advanced button leads to a dialog that chooses DHCP or static addressing and other similar options.
Bluetooth
You can access a limited subset of storage directories by way of Nokia's Bluetooth adaptor. If you have Bluetooth installed in KDE and if you have a Bluetooth adaptor on your desktop, you can use this procedure:This is obviously less powerful and comprehensive than the SSH access method described above, but it is also a great deal safer.
USB Interface
The Nokia comes equipped with a special USB cable with a super-tiny connector on one end that is probably unique to Nokia. If you connect this cable between the Nokia and your desktop, and if you are running a recent Linux distribution on the desktop machine, you will see one or two new icons appear (one if you don't have a mini-SD memory card installed in the Nokia, two if you do). This turns out to be an easy way to quickly transfer a lot of data between a desktop machine and the Nokia.
There are certain internal hints in configuration files about either USB hosting or USB networking, but these are not mentioned in the documentation and are probably not supported.
The Nokia cannot be charged by way of a USB connection, at least not directly. There is an adaptor available that fits between a normal USB cable and the Nokia power port.
Cell Phone Interface
The Nokia Bluetooth architecture allows you to use a Bluetooth-equipped cell phone as an Internet gateway. I have a Motorola Maxx Ve that has Bluetooth. I'm too cheap to buy the high-speed Internet options Verizon offers, but Verizon has a low-speed (14.4 kb/s) service called "Quick2Net" that only costs airtime, I've figured out how to connect to it, and the Nokia can be easily configured for it:
This should allow you to access the Quick2Net service on-demand from the Nokia. It's not fast, but as I understand it, the service only costs you airtime.
These instructions are obviously Verizon-specific, but they show how to enter non-standard options that will be useful when configuring for other providers.
General Networking Notes
Maemo has a very slick mechanism to decide how to get Internet access. First, you tell it which options to exercise (in Control Panel ... Connectivity). Next, given the user's preferences, Maemo makes pretty intelligent decisions — it doesn't connect until it needs to, and it makes the best choice when alternatives are presented to it (by, for example, choosing the best access point signal from a list of alternatives). Again, this scheme is fully described here.As usual in modern times, users expect more than technology can possibly deliver. All one needs to do is visit YouTube from the Nokia and click a few links, to see how quickly the machine gets bogged down trying to play videos (I have a pretty fast internet connection and a 802.11G-capable wireless router). But this isn't a criticism of the Nokia, it's an obvious and predictable limitation.
As I get older, I encounter more and more things that only fit in the "Miscellaneous" category. This is the technological equivalent of an experienced mother's remark: "Before, I had six rules and no children. Now I have six children and no rules."
On the top edge of the Nokia there are two controls to the left of the power button. The leftmost button maximizes/restores the active window, and the next control to the right, a rocker with "-" and "+" symbols, is used to zoom the current window's fonts and images. Both controls can be operated with one hand while doing someting else — they're a nice touch.
Once you have set up some e-mail accounts (you may configure multiple accounts), a system daemon periodically checks the status of the accounts. If there are new messages, the LED at the upper left of the Nokia flashes blue to alert you. This feature works whether or not you are running the e-mail program. Pretty slick.
At first I couldn't figure out an easy way to scroll up and down in a Web page. I thought how difficult it would be to read a book in this unit if I had to use the scroll tabs to navigate. Then, quite accidentally, I discovered you can drag the page with the stylus or a fingertip, directly in the main part of the display.
The browser crashes a lot (I am running Maemo 1.2007.42-19). This happens at any number of sites, but for confirmation, one can reliably crash the browser by visiting one of my pages on this site and double-clicking a word to get its dictionary definition (most of my pages have this feature). In fact, now that I think about it, at the time of writing this very page will crash the Maemo browser if the user double-clicks a word.
There is a GPS receiver built into the Nokia, as well as a mapping program. After a lot of testing, I have concluded that the GPS lacks sensitivity when compared to a dedicated GPS receiver. I use GPS receivers quite a lot, both for serious navigation while boating in Alaska as well as for hiking, and I have certain expectations that a GPS needs to meet. In side-by-side comparison tests with a Garmin GPS receiver, I found the Nokia was unable to acquire and maintain a fix nearly as well as the Garmin, and sometimes failed to acquire a fix at all while the Garmin functioned normally. Notwithstanding these drawbacks, in most circumstances the Nokia can sit on your car's dashboard (mounting bracket provided), and (assuming you have a typical sloping windshield to give the Nokia a view of the sky) you should be able to track your progress on its moving-map display.
The map application bundled with the Nokia is sadly lacking in basic refinements. In truth, it is one of those crippled non-applications meant only to tease you into buying the "full-featured" version. It would be nice to be able to to import and export waypoints between the map application and the rest of the world, but this feature isn't provided. Without a waypoint import/export capability and a reliable way to create and display waypoints, this map application just can't be taken seriously.
There isn't a decent organizer/scheduler application available at the moment. One can set basic alarms in the "Clock" applet, and one can install "gpe-calendar" from the repositories, but the latter isn't particularly advanced. I think someone will eventually recognize this lack and produce something reasonable for this class of machine.
The provided media player performs well, given my simple requirements. I purchased and installed an add-on mini-SD memory card, 4GB (near the upper limit at the time of writing), then loaded part of my MP3 music library onto it. The media player automatically found and cataloged the music (helped along by my having included ".m3u" index files, a process explained here), then I found it easy to use the media player to locate and play things. The media player also has a big index of Internet radio sites.
Unlike a typical desktop Linux distribution, Maemo as provided with the Nokia is preloaded with drivers for MP3s and other common audio formats, as well as a number of common video formats.
For those who are into VOIP and handhelds, I think Skype will remain the application of choice. Skype doesn't support the Webcam at the time of writing, but it behaves well as a Nokia application.
As is so often the case with handhelds, Java is not supported in the browser. I have quite a few Java applications and applets scattered around my Website, so I quickly notice the absence of Java. I suspect the reason is the big footprint of the Java runtime engine and how this conflicts with the strict storage and memory limits imposed by a typical handheld.
I hope I'm not sounding overly critical. This browser is a big improvement over what existed in the past for this class of computer, and I'm sure it will improve further. I find I can productively visit The New York Times and similar sites that demand a lot from a browser.
Overall I am impressed by this Nokia unit. It does a number of things very well. I especially like how it autonomously connects to the internet in a complex environment with multiple access points.
I would like to have seen a better mapping capability and a better GPS receiver, but I realize this is a personal priority that may not be shared by other purchasers. I think with a small additional effort a unit like this could become a TomTom challenger, just because it would do so many things besides get you where you're going.
Thanks!
Thank you for putting together a very very informative guide on the Nokia n810. I was fortunate enough to find your site within an hour or so after charging my 810 for the first time. Your site made it possible for me to quickly and easily connect the 810 to my home wireless router. I look forward to using the balance of your guide. Thanks again. Thank you! I'm glad my guide came to your attention.
| Home | | Linux | | Nokia | | Share This Page |