Share This Page
| Home | | Computer Graphics | | | | Share This Page |
How to see in three dimensions
— P. Lutus — Message Page —
Copyright © 2021, P. Lutus
Most recent update:
(double-click any word to see its definition)
NOTE: see the video version of this article.

Anaglyphic (red/cyan) 3D example — click image to enable/disable 3D effect (
)
People have two eyes for a reason — it's why we can see how far away things are. Exactly how we do this is one of the many unsolved mysteries of the human brain, but the principle is easy to describe — our left and right eyes get slightly different views of our surroundings, and our brains translate these views into depth information.
That's how it works in reality, in nature. In a virtual world, to have a three-dimensional view we must provide our eyes with separate views that differ in the same way that a natural view does. This depth perception greatly increases the persuasiveness and usefulness of virtual reality displays.
In this article I explain how to create 3D views on computer displays and on paper. I show examples of different methods and provide tutorials for creating your own 3D images.
There are many ways to provide our eyes with 3D information, ranging from crude to elegant. Here are some examples.
Wiggle Stereoscopy
One of the simpler methods is called "Wiggle stereoscopy", not elegant but sometimes effective. Here's an example (click the image to start/stop the effect):

Wiggle stereoscopy example (Click image to start/stop effect)
When I first saw this effect, I had the reaction I imagine many people do: "I can't believe that works!"
This effect works because it imitates a natural behavior in which a person moves his view laterally to judge the distance to remote objects.
Wiggle stereoscopy has the advantage that no special equipment is needed — just two images separated by a suitable horizontal angle and a way to switch the images in a timed sequence. The drawbacks should be obvious — the effect can't easily be scaled up to accommodate larger, more detailed images, it doesn't produce a high-quality result, and some find viewing the image annoying for longer than a few seconds.
Red/Cyan Anaglyph
A "Red/Cyan Anaglyph" is a popular, time-honored and inexpensive method that relies on color filtering to combine two views in a single image. Special, usually inexpensive, glasses with color filters (
Because of the need for color filtering to correctly direct the images, this method works best with monochrome source images, but some color images can work with this method.
A red/cyan anaglyphic image is created like this:
Acquire two images separated by a suitable horizontal angle:
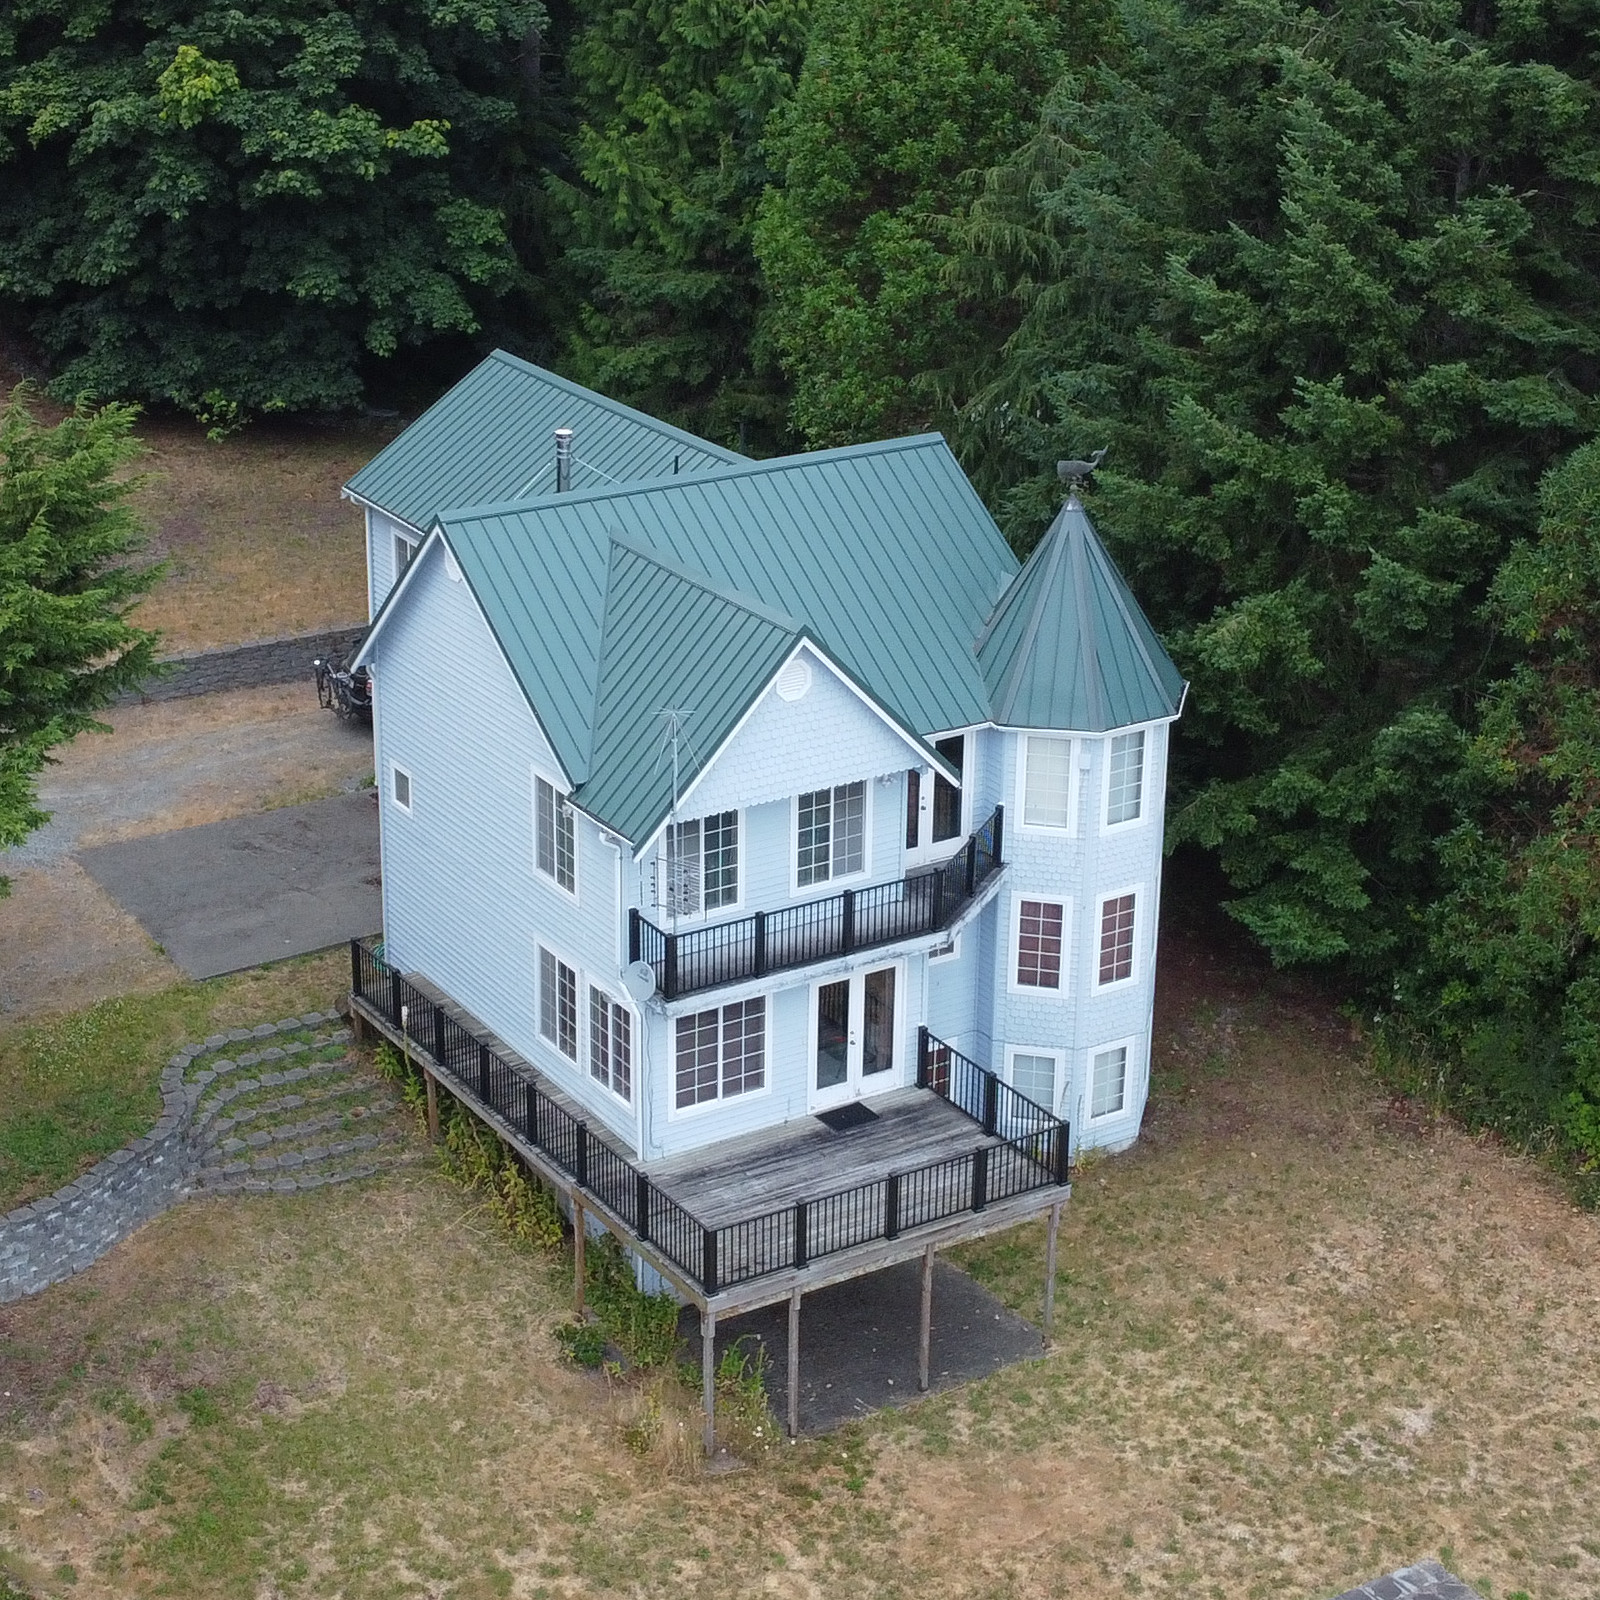
Left Image
Right Image
Note that the left and right image viewpoints are positioned at slightly different angles with respect to the house. I acquired these images with a quadcopter moving laterally, see technical notes below.Make color-filtered versions of the images (using methods explained later in this article):
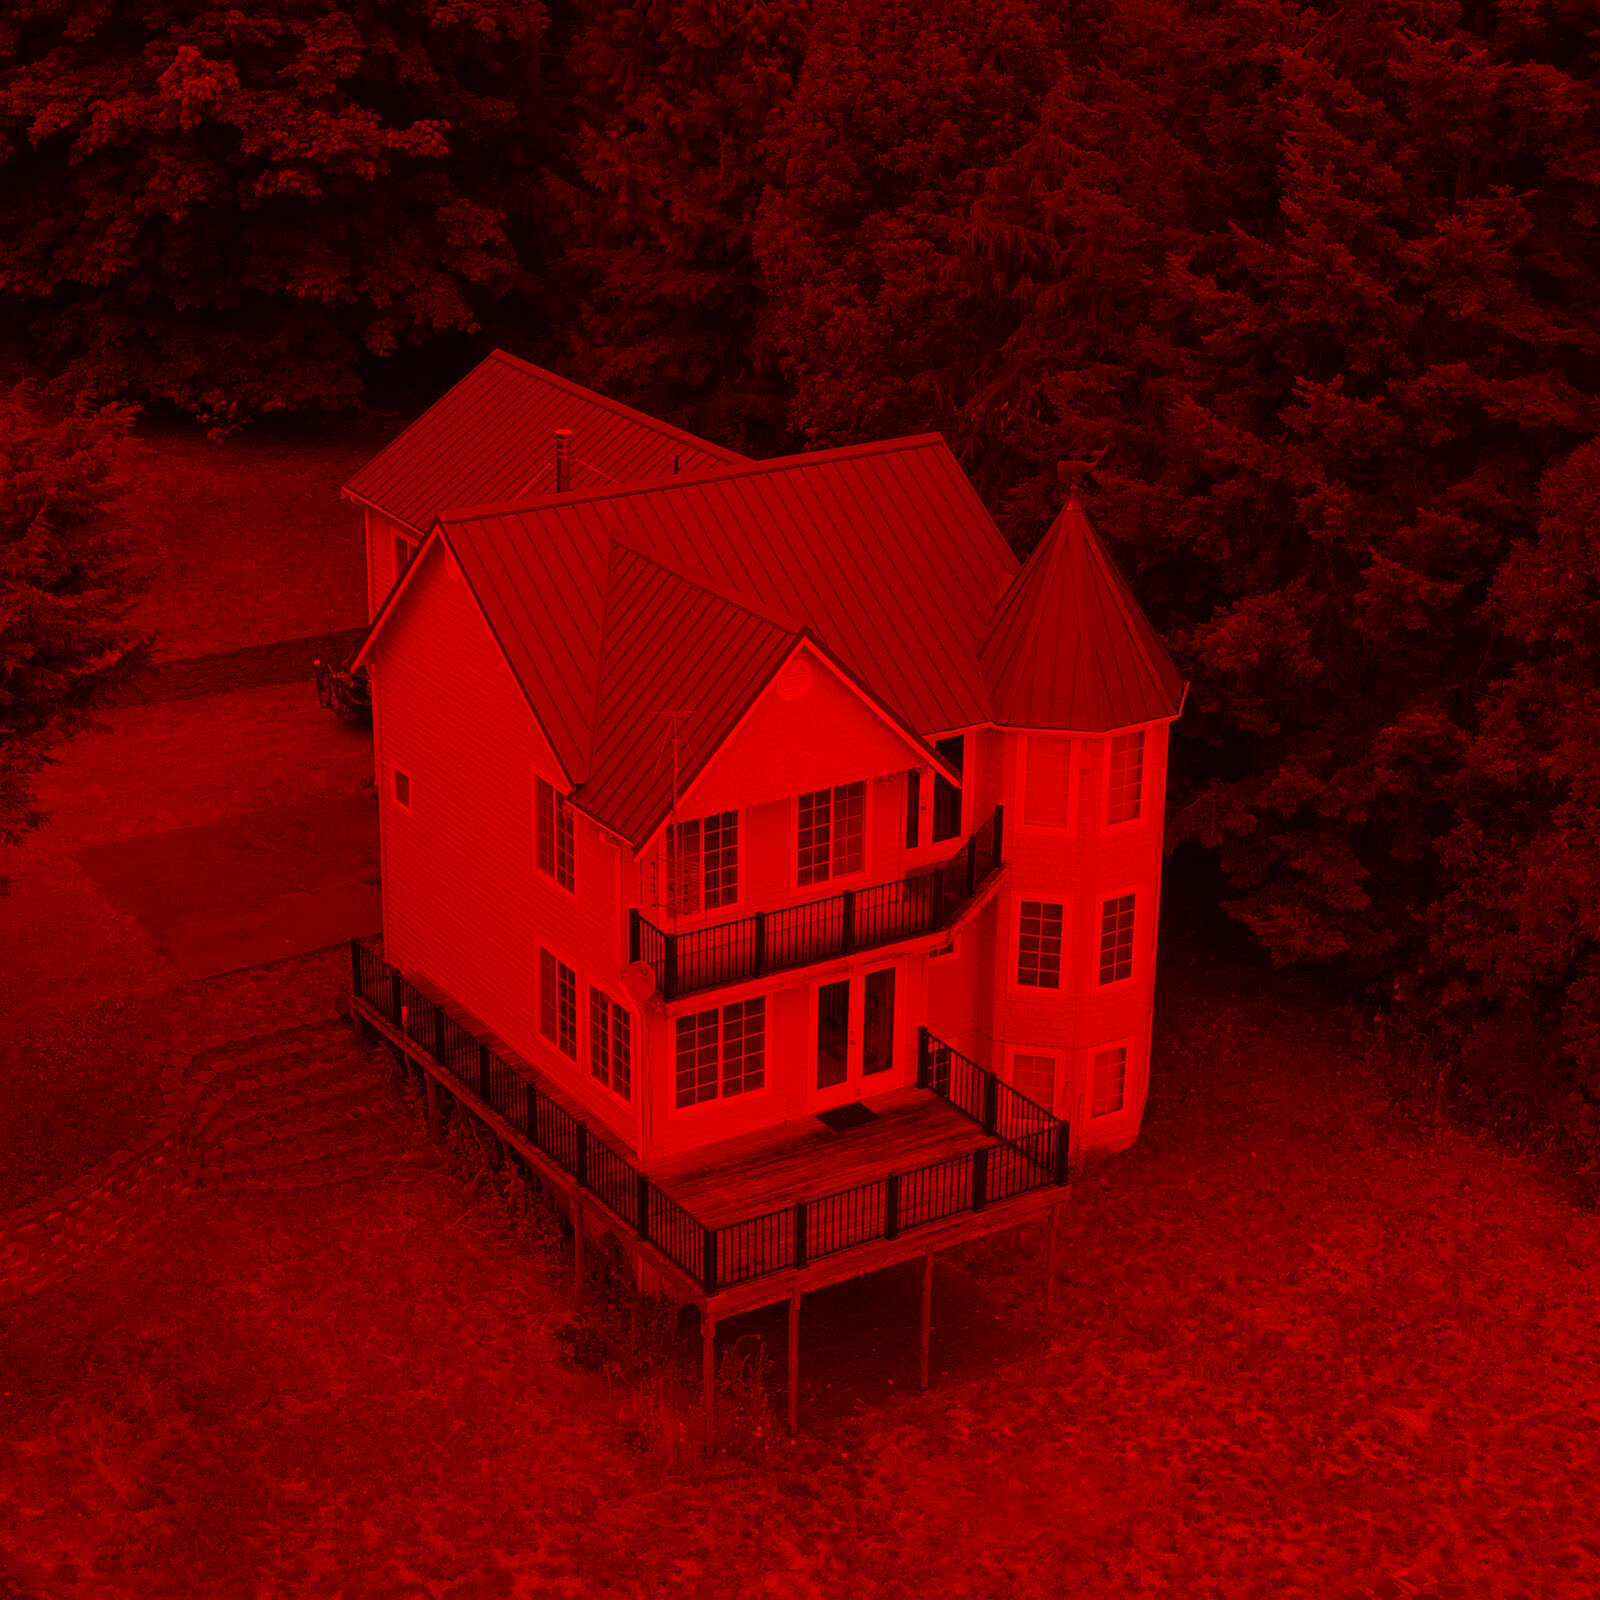
Left Image, red only
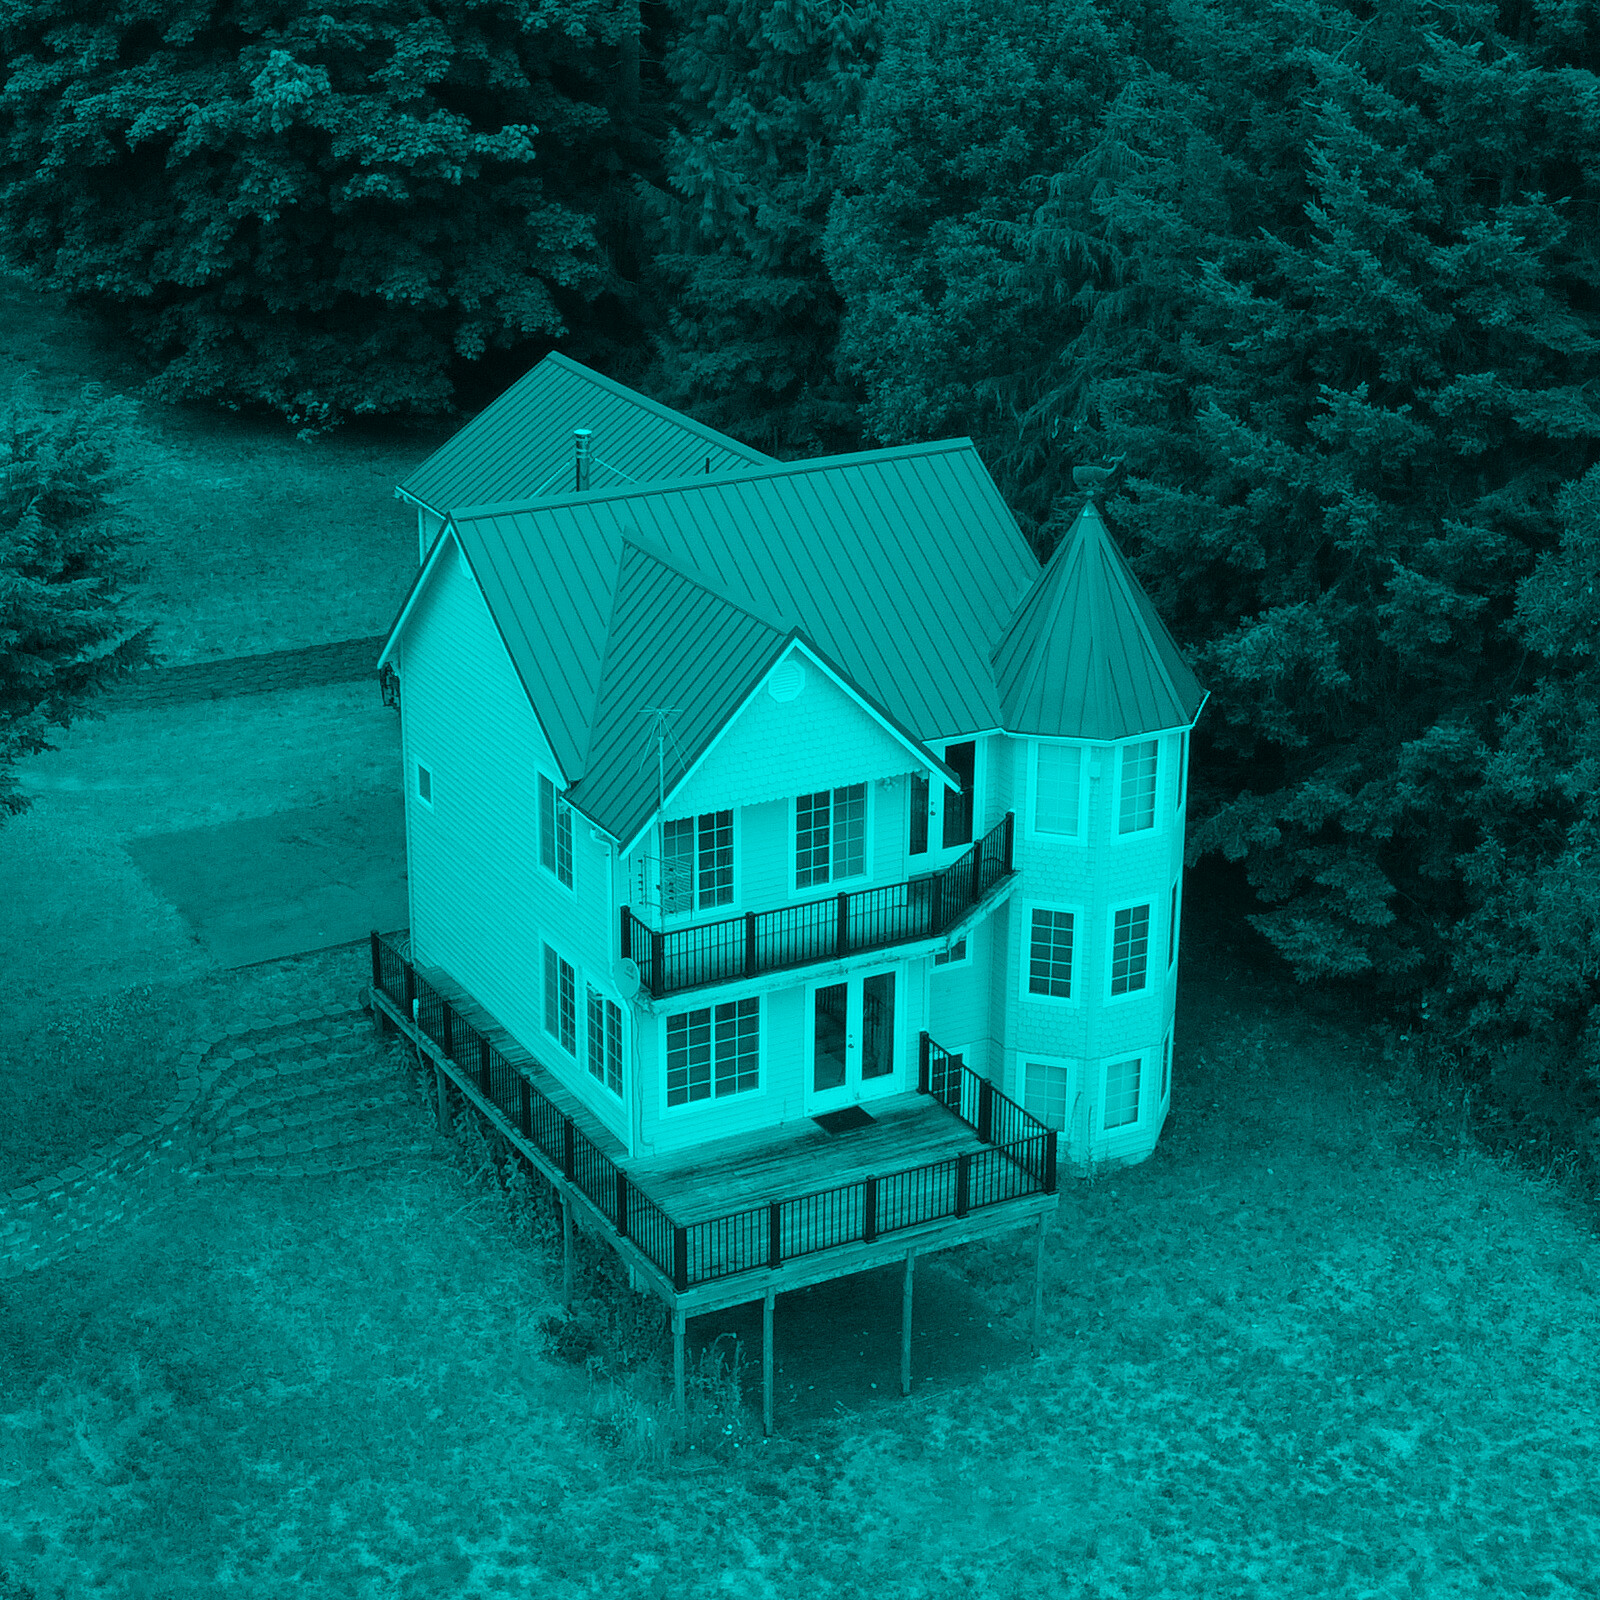
Right Image, green/blue (cyan) only
Note that the left image includes only red colors,
the right image includes only cyan (blue/green) colors.Combine the two images so that all the red color information originates with the left image and all the cyan color information originates with the right image:

Click image for full-size
When viewed with anaglyphic (red/cyan) glasses (
This red/cyan filtering method takes advantage of the fact that modern computer graphic images have three color channels — red, green and blue. This means two images can be prepared that contain:
- Red pixels for the left image and
- Green and blue pixels for the right image.
Because the two source images contain colors with no overlap between them, they can be combined into a single image with no interference between colors.
This article section includes a step-by-step tutorial that explains how to create and process your own stereo images.
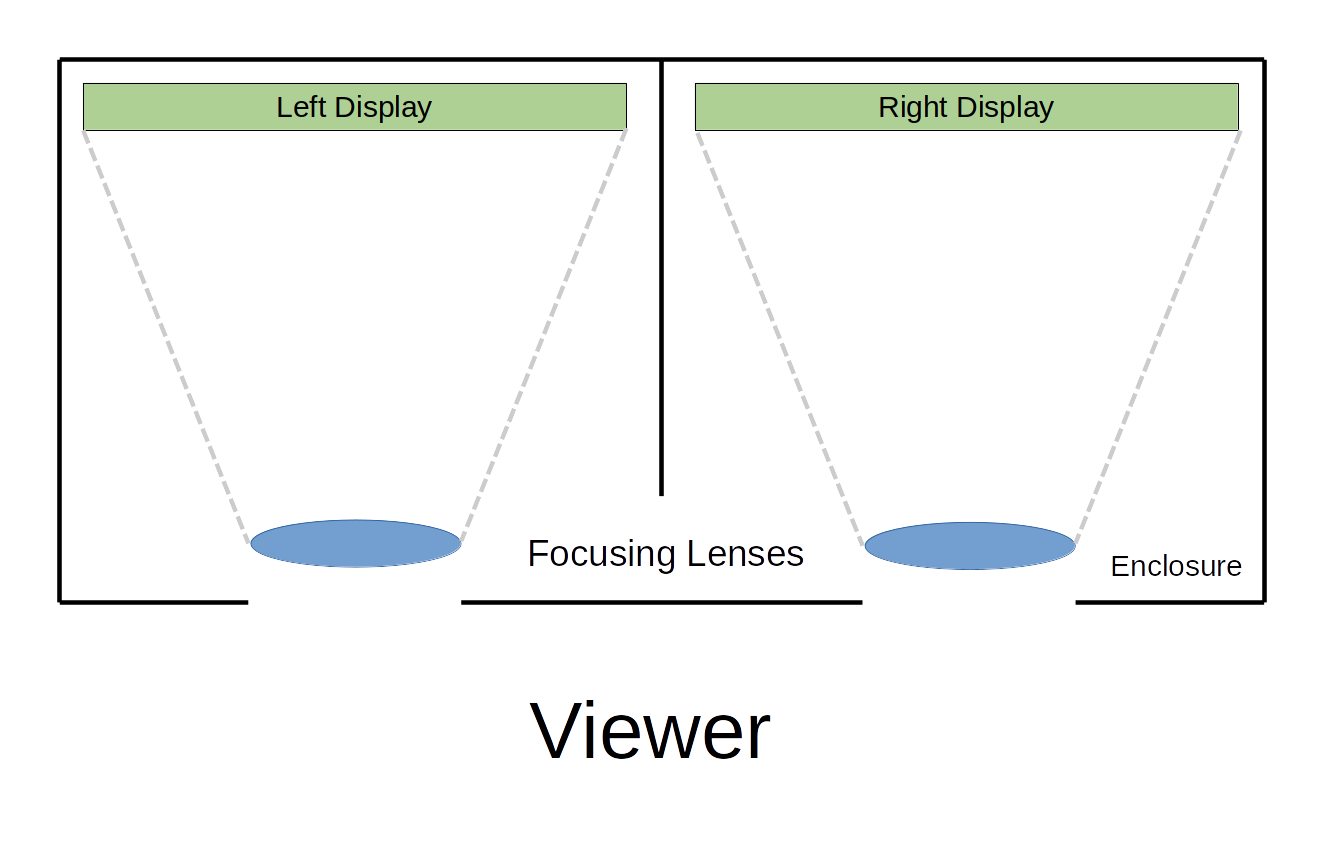
Virtual Reality Goggles
VR googles may be more expensive but produce better results than the above methods. In this method, the viewer uses a device with separate displays (or a single wide display like a cellphone) with one image for each eye:
Stereo Viewer
This method has a long history, extending back to the days of photographic images printed on paper:
As computers became more powerful and less expensive, people began to think of ways to build inexpensive 3D viewers without the limitations of anaglyphic (red/cyan) and other methods. A wide-aspect-ratio cell phone display became an obvious method — here's the prior example image as displayed on a cell phone:
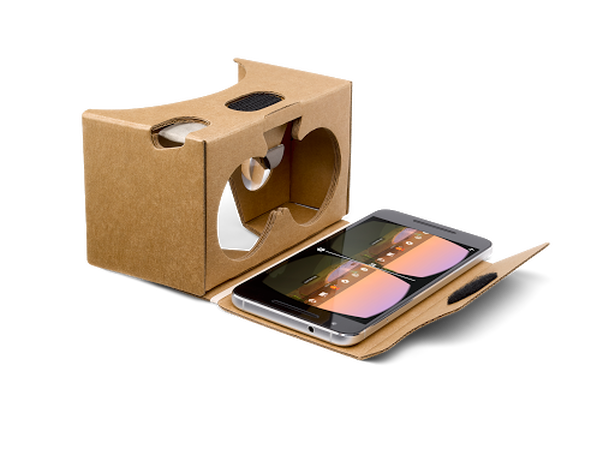
Google Cardboard
Until recently Google offered an effective and inexpensive viewer called a "Google cardboard":This ingenious device consists of two lenses, an enclosure, and the user's cellphone as a display. Since March 2021 this device is no longer offered for sale by Google, but because it's been open-sourced, other makers are free to build the design.
Oculus Rift / Rift S
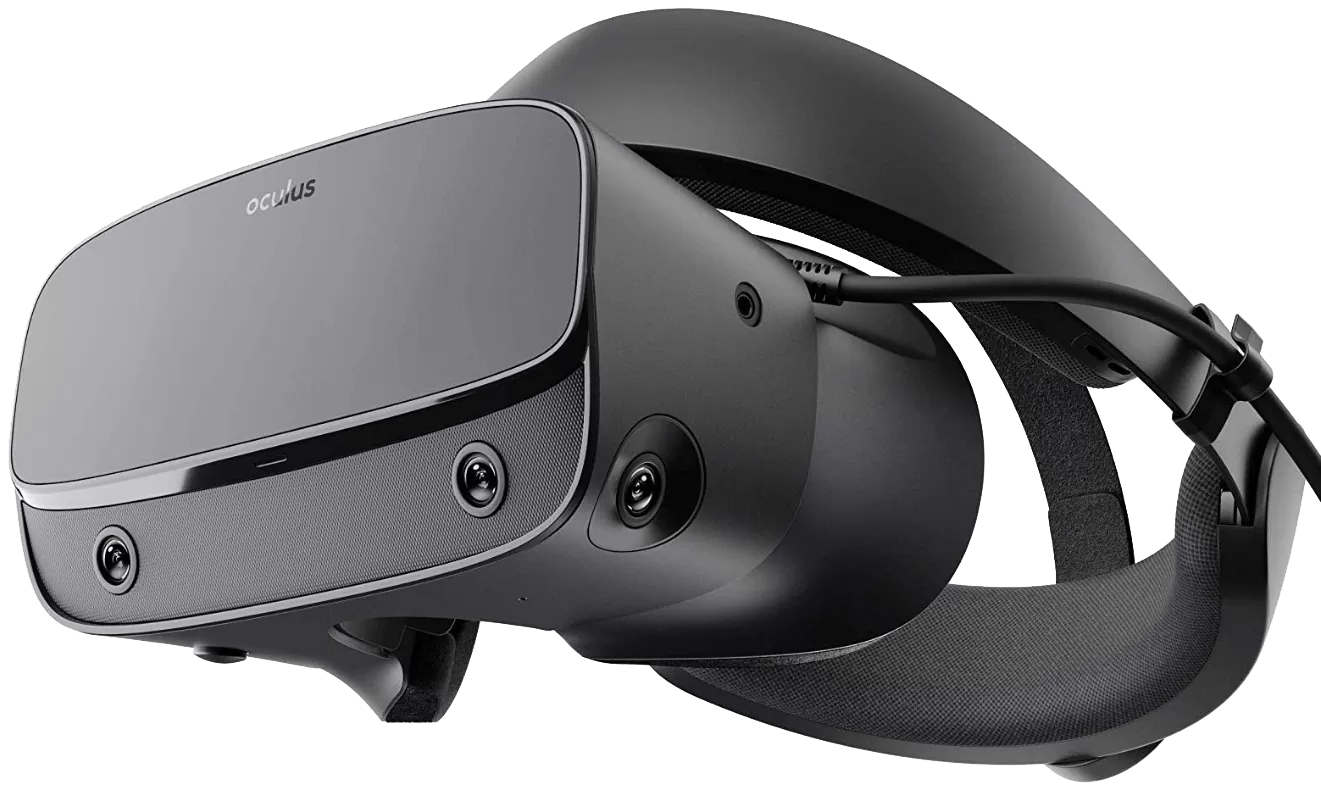
Oculus Rift S
In 2011 Palmer Luckey created a prototype of the Oculus Rift in his parents' garage in Long Beach, California. By 2016 Luckey had formed a company named Oculus VR and began shipping consumer-ready devices. In 2019 Oculus VR began shipping a more advanced viewer named Oculus Rift S.
In parallel with these events Palmer Luckey sold his company to Facebook for something north of two billion dollars, after being assured by Facebook executives that (a) Oculus buyers would not have to acquire a Facebook account and (b) the Oculus headset would not become an advertising delivery device. Facebook has since broken both promises — after closing the deal, Facebook imposed the requirement that Oculus purchasers must have a Facebook account, and they're planning in-viewer advertising for the Oculus devices, describing themselves as "excited by the opportunity to open up new revenue streams". (When I read quotes like this I wonder whether these creatures know how they sound to human ears.)
When I first heard about Mr. Luckey's plan to sell his company to Facebook, I and many others could see what was coming, but perhaps surprisingly, Luckey had no idea. Too young and inexperienced, I guess. But for people who expect to have some measure of control over their lives, who refuse to be someone's involuntary product, any association with Facebook is out of the question, therefore so is Oculus. In a perfect world people would boycott both Facebook and Oculus, Facebook's new advertising organ.
But look on the bright side. Eventually patents will expire, inexpensive and unencumbered VR hardware will become commonplace, after which people will acquire VR viewers without joining mindless social media swarms or offering themselves up as advertising targets.
This is why the remainder of this article discusses comparatively low-tech, open-source methods like anaglyphic 3D processing of still and animated images — you can do these things without becoming part of the problem.
Anaglyphic Images from a Camera or DroneI emphasize the anaglyphic (red/cyan) 3D image method because the special glasses are inexpensive and the image processing programs are free and open-source. It turns out that one doesn't need to spend a lot of money, get a Facebook account and watch advertisements in 3D.
Image Acquisition
You can acquire 3D image pairs with a cellphone, a digital camera or a camera-equipped drone. It's a simple matter of taking a picture, moving the camera horizontally, and taking another picture. Here are some hints:
- Remember that the anaglyphic conversion process requires two source images separated by a horizontal distance. The images represent the 3D viewer's eye locations.
- After taking one picture, move the camera horizontally a relatively short distance, not unlike the distance between one's eyes, and take another picture. Use a tripod if possible.
- Avoid tilting the camera between exposures — try to keep the camera level for both pictures.
- For pictures taken with a drone, you may want to move the drone horizontally in increments and take many exposures, then choose the best two pictures later.
- If possible avoid camera features like automatic white balance and exposure control — these tend to make successive exposures different in ways that reduce the quality of the result.
- Take many pictures. It's much easier to select optimal exposures when you have many from which to choose. As photographers say, it's better to have pictures you don't need, than need pictures you don't have.
- If you intend to make a full-color 3D image, avoid subjects that include bright saturated colors, red and blue in particular. A better subject — one with subdued colors, particularly shades of brown and/or green — can produce satisfactory color 3D images, as with the earlier house image.
- To remove colors that would spoil the result, use the ImageMagick program argument "-colorspace gray" described below in the Image Conversion section.
ImageMagick Installation
ImageMagick is a free, open-source suite of utility programs that can be used to process digital images. The utilities include an easy way to create anaglyphic images. ImageMagick has versions for Windows, Macintosh and Linux.
ImageMagick is easy to install and it includes a simple command to create 3D anaglyphic images. Let's start with installation:
- Windows: Download the installation executable from this link and install it.
- Macintosh: Download the installation package from this link and follow the detailed installation instructions.
- Linux: Download and install the appropriate installation package from this link or (better) use your Linux distribution's package management utility to install a pre-optimized ImageMagick package. Example: in Ubuntu, in a terminal session, you can enter this:
Done. Very easy.sudo apt install imagemagickImage Conversion
For each of the supported platforms ImageMagick works much the same — you open a command shell, navigate to the directory containing the source images and enter a command like this:
composite -stereo 0 rightimage.jpg leftimage.jpg result.jpgFor Windows there's one difference. For each command, precede "composite" with "magick" like this:
magick composite -stereo 0 rightimage.jpg leftimage.jpg result.jpgIn other respects, Windows ImageMagick commands are the same as for the other supported platforms.
Image conversion notes:
- The above "composite" command takes the blue and green pixels from "rightimage.jpg", the red pixels from "leftimage.jpg", and creates a new file named "result.jpg" that combines the red, green and blue pixels in a way that produces an anaglyphic image.
- The file names are only examples, any file names may be used.
- The source files don't need to be JPEG images, many other image types may be used.
- The "-stereo" argument must be present, but the following number(s) can be used to offset one source image with respect to the other. This can be used to correct for differential misalignments. For example if one image is offset by 50 pixels in the X axis and -25 pixels in the Y axis, one would enter:
composite -stereo +50-25 rightimage.jpg leftimage.jpg result.jpg- If the source images have color but a monochrome result is needed, use this command:
This command removes all color information from the source images. This step may be required in cases where bright colors, red and blue in particular, degrade the anaglyphic result.composite -colospace gray -stereo 0 rightimage.jpg leftimage.jpg result.jpg
Blender is a powerful, free, open-source graphics program that can create many interesting images and animations. Blender can be downloaded from this page for its many supported platforms.
I include this section because recent Blender versions include full support for stereo images/videos including the anaglyphic (red/cyan) encoding already described. Getting 3D Blender results is a simple matter of enabling a few options.
Because of its complexity I'm not going to try to describe in detail how to use Blender (click this link for general Blender documentation and support), instead I describe how to enable particular Blender features that let you create anaglyphic 3D images and videos.
Enable Stereo Rendering
For guidance here's a layout diagram for a recent (July 2021) Blender version (click image for full-size):

Here's a simple procedure to enable 3D anaglyphic rendering in Blender:
- Run Blender in default mode with no project files.
- Dismiss the initial splash dialog so the default cube is on display in the 3D viewport.
- Go to the Properties Editor (lower right) and select the "Output Properties" tab.
- Scroll down if necessary and check the "Stereoscopy" option checkbox.
- Move to the 3D viewport and select the Camera icon on the right edge of the window.
Now you should see this (click image for full-size):

If you now don your red/cyan glasses, the default Blender cube should appear in 3D.
Example Blender Project: Chessboard
Click here to download an example Blender project that shows a chessboard and animates it in 3D. Here is how it should appear initially (click image for full-size):

Now use these instructions to enable 3D rendering in Blender, which should show this (click image for full-size):

Use the Blender timeline controls (bottom center) to start/stop the chessboard animation.
- As before, don your red/cyan glasses to see the chessboard in 3D.
NOTE: This chessboard is a suitable color anaglyphic 3D subject only because its colors are subdued and have no bright red or blue colors.
Here is a video of the resulting animation:
Rotating chessboard video (view with 3D glasses
Imagine creating a Blender animation video as one sometimes sees on YouTube or other video sites, but encoded for anaglyphic 3D viewing like the above example. It turns out there's a small group of YouTube 3D video creators, many of whom use the anaglyphic encoding method. Search on YouTube using the keyword "anaglyphic". Some of these creators use special side-by-side 3D cameras to capture real-world scenes, others use the above-described Blender encoding method.
I suggest these ideas partly to dispel the idea that one must have a Facebook account and an Oculus S (and watch advertisements) in order to experience 3D virtual reality. If that were true it would be a shame.

Anaglyphic 3D images printed on paper (click for full-size)
A device like the Google Cardboard (or an old-style stereo viewer as shown earlier) can be used to view side-by-side binocular images printed on paper, and the anaglyphic (red/cyan) image coding method can be used to create paper-printed images, but for the latter, a high-quality color printer is needed to render colors well enough to preserve the delicate color rendering on which this technique relies. The above pictured paper images were rendered by a high-quality laser printer — many inkjet and other kinds of printers won't be able to render 3D images with enough color fidelity.
Substandard Anaglyphic Glasses
A note on the above image. I included a pair of anaglyphic glasses in the image only to suggest how the paper-printed images need to be viewed, but the specific glasses shown in the image have a defect: the blue filter is the wrong color and is too dark, so I don't recommend that people buy those specific, widely available but defective, glasses.
In a small irony, the graphic I use to identify anaglyphic glasses —
— shows an optimal cyan filter color, but when you try to buy the same glasses online, you may or may not get the correct filter color, and the online images showing the product may mislead you (not all glasses with the above appearance have this defect).
Ironically, many cheaper 3D glasses have a better quality cyan color filter, the right complement to the accompanying red filter and which creates a neutrally colored binocular view as well as being brighter than with the glasses shown in the above paper-image graphic.
Multi-generation Color Degrading
Another note on the above image. Try viewing the image with 3D glasses and see how poor the result is compared to the other images in this article. The reason is that the original images were created in a computer, printed on paper using a laser printer, then the scene was captured with a cellphone camera. All these steps inevitably degrade the fidelity of the color rendering such that the result is of unacceptable quality. This outcome results mostly from the poor color rendering of the cellphone camera, which captured an image from a paper print that was illuminated with artificial light sources, and using something called automatic white balance. This combination of effects prevents an accurate 3D mix of colors and spoils the effect.
But when viewing the original paper prints using better-quality anaglyphic glasses, the result is quite good and perfectly acceptable.
A small amount of mathematics is desirable to process 3D images, nothing difficult. The basic idea is to measure the distance between one's eyes (distance A), the distance from one's eyes to a subject (distance B), then use those measurements to calculate the angle required to produce a satisfactory 3D effect:
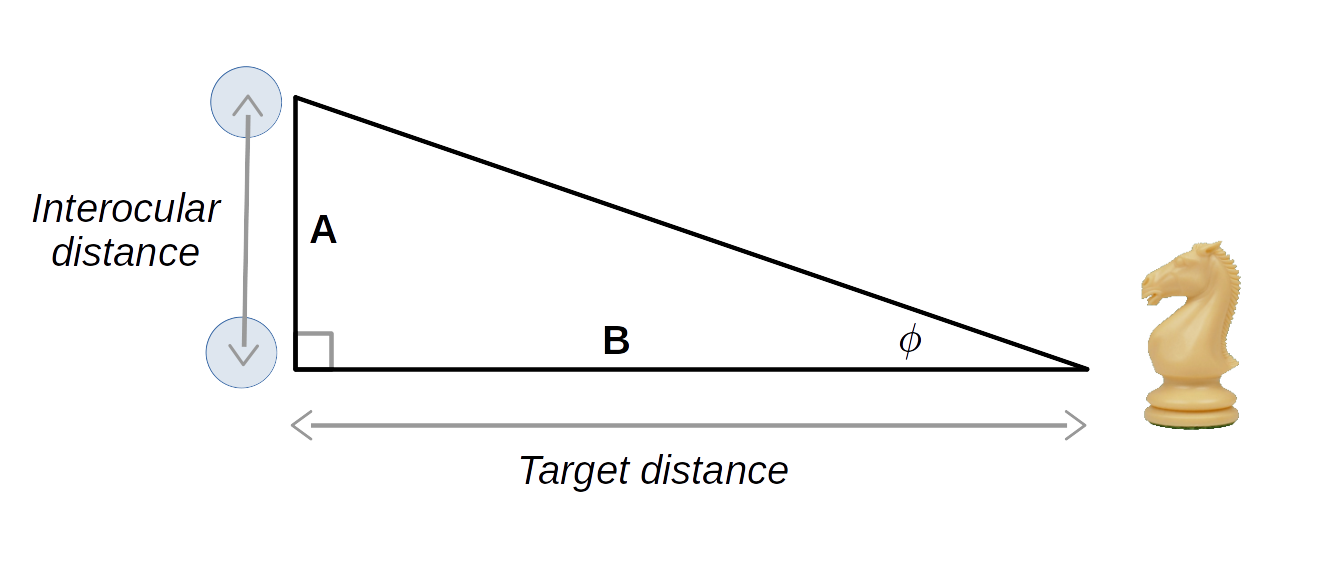
For problems like that shown in this diagram, the equation for Φ (an angle) is:
\begin{equation} \phi = \tan^{-1}(\frac{A}{B}) \end{equation}Why is this angle important? It's because our eyes don't sense sizes, they sense angles. We see a nearby object as larger than the same object farther away only because the nearby object occupies a larger angle in our field of view.
Let's work one example problem. Let's say we're looking at a chessboard sitting on a table. Let's say the chessboard is 50cm distant from our eyes and our interocular distance (distance between our eyes) is 6.3cm. The computed value for Φ is therefore:
\begin{equation} \phi = \tan^{-1}(\frac{A}{B}) = \tan^{-1}(\frac{6.3}{50}) = 7.2° \end{equation}The 7.2° result means that, from the perspective of the chessboard, the viewer's eyes are separated by 7.2 degrees. This angular separation is essential to creating a 3D effect.
This result may serve as a handy rule of thumb for many similar problems, but it's important to say that choosing the best distance between binocular views can be a matter of judgment and aesthetics.
Now for the next step. For a given distance B from a viewer to a target, the result from equation (2) above can provide a distance (A) to move a camera (or a drone) laterally between exposures, to get a satisfactory 3D image:
\begin{equation} A = B \tan(\phi) \end{equation} For the example above, we can compute: \begin{equation} A = B \tan(\phi) = 50 \tan(7.2) = 6.3 \text{cm} \end{equation}So to produce a reasonable image pair for 3D viewing, we would move our camera (or drone) laterally 6.3cm between exposures.
Assuming this result produces good outcomes, a simpler approach is to compute $\tan(7.2)$ or 0.126, then apply this simple factor to field problems involving various target distances. For example, the house in the above example images above was about 100 meters distant from the drone taking the pictures — how much lateral distance should I move the drone between exposures?
\begin{equation} A = B \times 0.126 = 100 \times 0.126 = 12.6 \, \text{meters} \end{equation}This mathematical approach is a good first step in advance planning, but in practice, because of many subjective factors involved in binocular vision, it's best to take many pictures and choose the right pair of images in post-processing.
Also, a strictly realistic image collection program would always move the camera 6.3cm between exposures regardless of the distance to the target, since that's the real interocular distance for our modeled observer, but this produces less and less subjective depth perception as target distances increase, so this rule is rarely followed.
I think we should realize we're living in a time of transitional technology, technology that will be replaced by much better quality image sources and rendering methods, such that anaglyphic 3D images will be seen as a historical curiosity, on our way to higher quality methods for rendering computer images.
I also think in the future, cutting-edge devices like the Oculus S won't be held hostage by a notorious octopus like Facebook and offered for ransom to a vast army of techno-serfs (i.e. Facebook members). By contrast, in my imagined future such devices will be offered in an open marketplace of devices and ideas, a marketplace that respects and honors individual privacy and integrity.
Thanks for reading!
| Home | | Computer Graphics | | | | Share This Page |